Cheapest house in town, My house.
Moderators: Greg, Mark, mhrAJ333, JD
-
vintage steel
- Posts: 25
- Joined: Thu Feb 09, 2012 2:56 pm
I've been busy.
A little curb appeal. Front side face lift;

Those tongues had to go!
 This is, my man Kerry, surgically removing the front 10" of roof. I swear that guy was born with a SkillSaw in his hand.

Looks better already;

Frame in for a new window;

Sheet it over;

We got a bit farther than that, but it was getting too dark to take pictures.
A little curb appeal. Front side face lift;
Those tongues had to go!
This is, my man Kerry, surgically removing the front 10" of roof. I swear that guy was born with a SkillSaw in his hand.Looks better already;
Frame in for a new window;
Sheet it over;
We got a bit farther than that, but it was getting too dark to take pictures.
-
vintage steel
- Posts: 25
- Joined: Thu Feb 09, 2012 2:56 pm
I've been pretty busy, haven't had a chance to update.
We finished sheeting the floor, there are NO holes or rotten spots anywhere in the floor now!

Started working on the roof: (Cindy does NOT like heights but she got up there and helped with the roof, she didn't like it, but she did it, that's my girl )
)

Framed in the "maintenance room" addition:

I used 2x6 lumber for added insulation:

and started sheeting the roof. I chose 1" rigid foam with an R-5 rating and 1x6 strips.
The 1x6's are screwed through the foam into the rafters at every intersection. we had to skip one row of lumber on each side as the roof wasn't exactly 'flat'.
I used 16" wide pieces of 3/4" OSB subfloor on the edges for the 6" overhang this made the soffits good and rigid:

While Kerry and I were skinning the roof, Chris was ahead of us scraping all the large chunks off the old roof.

Should have the roof done tomorrow, then I can start concentrating on the inside.
We finished sheeting the floor, there are NO holes or rotten spots anywhere in the floor now!
Started working on the roof: (Cindy does NOT like heights but she got up there and helped with the roof, she didn't like it, but she did it, that's my girl
Framed in the "maintenance room" addition:
I used 2x6 lumber for added insulation:
and started sheeting the roof. I chose 1" rigid foam with an R-5 rating and 1x6 strips.
The 1x6's are screwed through the foam into the rafters at every intersection. we had to skip one row of lumber on each side as the roof wasn't exactly 'flat'.
I used 16" wide pieces of 3/4" OSB subfloor on the edges for the 6" overhang this made the soffits good and rigid:
While Kerry and I were skinning the roof, Chris was ahead of us scraping all the large chunks off the old roof.
Should have the roof done tomorrow, then I can start concentrating on the inside.
-
vintage steel
- Posts: 25
- Joined: Thu Feb 09, 2012 2:56 pm
I've been busy at my shop. Took a few days off to make some money.Steve-WA wrote:I've been waiting to see photos . . . What are you using to side over the osb?
...Siding? I live in North Idaho, that IS siding!
Seriously, I'll worry about that in the spring.
I got the roof put up. It started raining as I was putting on the last piece of tin, as soon as I got off the roof, it started snowing!!
Roof Done!!! Time for a break!!

Our little utility room:

Finished wrapping.

and my "hillbilly" shed that I made out of the tin that was on the porch we tore down.

-
vintage steel
- Posts: 25
- Joined: Thu Feb 09, 2012 2:56 pm
Slow and steady.
Removed some ceiling and insulation. Started framin interior walls.
This separates the master bath from the walk-in closet. The closet is on the left. You have to go through the bathroom to get to the closet.
The closet measures 4 1/2' x 11'

We reclaimed some of the 2x6 lumber from the porch we tore down:

...And used it to ftame the wall between the kitchen and the Mstr bath.
We will add plenty of insulation. (You don't want to hear what's happening in there from the kitchen)

Removed some ceiling and insulation. Started framin interior walls.
This separates the master bath from the walk-in closet. The closet is on the left. You have to go through the bathroom to get to the closet.
The closet measures 4 1/2' x 11'
We reclaimed some of the 2x6 lumber from the porch we tore down:
...And used it to ftame the wall between the kitchen and the Mstr bath.
We will add plenty of insulation. (You don't want to hear what's happening in there from the kitchen)
Ya know, I always think the same thing when I see construction projects: houses, commercial bldgs, etc. They put up sheathing on the exterior walls and roofs, and it sits out in the rain sometimes for weeks. Then they side or roof over it . . . WTH??
-
1987Commodore
- Posts: 383
- Joined: Mon Oct 25, 2010 9:53 pm
- Location: Steuben County, NY
OSB can get wet without disintegrating, as long as it does not get soaked. I have seen buildings with OSB exposed for years, and it's just discolored.
-
vintage steel
- Posts: 25
- Joined: Thu Feb 09, 2012 2:56 pm
I don't have much time when the sun shines.
When I got the time, I ain't got the money, when I got the money, I ain't got the time.
Anyway, here's a quick update;
Built a porch, added some shirting, boxxed in the eves, spread some gravel on the drive and planted some grass:
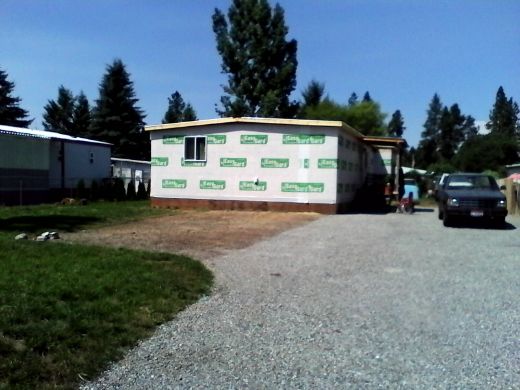
Next up ...siding.
When I got the time, I ain't got the money, when I got the money, I ain't got the time.
Anyway, here's a quick update;
Built a porch, added some shirting, boxxed in the eves, spread some gravel on the drive and planted some grass:
Next up ...siding.
-
1987Commodore
- Posts: 383
- Joined: Mon Oct 25, 2010 9:53 pm
- Location: Steuben County, NY
You're making progress! Looking much better than what you started with.
-
- Similar Topics
- Replies
- Views
- Last post
-
-
Finding a Water Valve for a House Bib?
by hstassen » Sat May 04, 2019 10:46 am » in Mobile Home Repair - 5 Replies
- 9110 Views
-
Last post by Greg
Mon May 06, 2019 6:11 pm
-
-
- 1 Replies
- 8870 Views
-
Last post by Mark440
Thu Oct 31, 2019 8:25 am