Ad blocker detected: Our website is made possible by displaying online advertisements to our visitors. Please consider supporting us by disabling your ad blocker on our website.
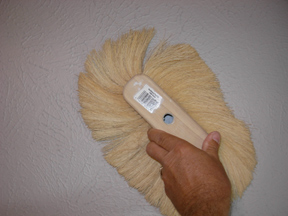
Yanita and I got off another topic during one of the previous posts and were discussing how I did the textured walls. I explained that it was simply thinned down lightweight joint compound that was applied with a brush but I didn't feel like I did a good job of describing the brush so I thought I would add a post with a picture of the brush next to the textured wall.
I was telling Yanita that you want to thin down the drywall mud so that you get enough of a texture to leave a good imprint but not enough to leave peaks and ridges that will break off later. Just 1/16" of texture will generally do the job. All you need to do is put enough on to cover your drywall seams.
The day you stop learning is the day you start dying.
When you applied it with the brush did you just dab it on or did you do circular motions? If I remember right you said something about 4 to 6 layers? Could you explain this?
Sorry for being late on the reply, I am not getting email notification of posts.
When this is applied you just jam the brush into the bucket of mud and slap it onto the wall. You keep slapping around the wall in new areas, trying to overlap somewhat, until the brush no longer lays down the desired amount of texture. Then you jam it back into the bucket and start over.
It's really quite simple. Just a methodical slapping of the wall. Try it on a scrap piece of drywall first and you will see how easy it is.
If you don't like how it looks, just keep slapping until you get the look you want.
You may have to thin or thicken the mud mixture to your preference of texture.
If you decide that you really don't like it, it will all scrape off with a drywall knife.
Remember, there are very few things that can't be redone, don't be afraid to try!
The day you stop learning is the day you start dying.